Companion blog: Adventures In Stoving

Monday, July 15, 2013

Is Marion Mountain "Wrong" on the USGS Topo?

I believe that the summit of Marion Mountain (10,362'/3158m) is "wrong" on the USGS topo map, or, more precisely, I believe that the spot elevation shown on the map is not the highest point of Marion Mountain.

Take a look at the below snippet of the USGS topographic map (San Jacinto Peak, 1:24,000).  Click to enlarge.
The spot elevation of 10,362' is positioned on the eastern portion of Marion Mountain's summit ridge.
The manually drawn in black dot is the approximate position of the actual highest point on Marion Mountain on the western portion of the summit ridge.

Note that the summit ridge of Marion Mountain has an east-west orientation and that the spot elevation is positioned on the eastern portion of the summit ridge.

Now look at this photo of Marion Mountain, taken from Folly Peak.  Note that the highest point appears to be on the western portion of the summit ridge.
Marion Mountain with directions indicated as shown
Now, have I got that right or is there some oddity in the camera angle or similar that might make the western end of the summit ridge of Marion Mountain look higher?  How can we verify where the high point is?

Well, fortunately, I've climbed Marion Mountain a couple of times.  The summit of Marion Mountain is quite obviously the highest point when you're standing atop it.
Summit bloc of Marion Mountain. 
Note climbing route arrows at bottom right of summit bloc.
Now, note also the arrows I've drawn in that indicate the standard climbing route (class three) by which one attains the summit.  One ascends the slab at the base of the summit bloc and then traverses right in the large diagonal crack as shown, gaining this large vertical crack by which the final summit is reached.
This vertical crack affords one a good class three route to the summit of Marion Mountain
These cracks (the traversing crack and the vertical crack) will allow us to identify the summit of Marion Mountain from a distance.  Here, for example, is a photo of the summit of Marion Mountain taken from the flanks of nearby Shirley Peak (10,388'/3166m).  I have drawn in arrows indicating the route.  Note a) the traversing crack and b) the vertical crack.
The summit of Marion Mountain.
Final ascent route shown in red.
On the very summit of Marion Mountain is the traditional summit register.  In that summit register are may signatures from Sierra Club Hundred Peaks Section (HPS) and Riverside Mountain Rescue Unit (RMRU) trips.
Summit register signatures from several RMRU members.
I believe that I have reasonably established that I have correctly identified the highest point on Marion Mountain because
  1. I have personally climbed Marion Mountain.  The highest point is distinctive and is unmistakably higher than any other point on the summit ridge.
  2. The highly distinctive summit cracks positively identify the high point.
  3. The summit register is positioned on the point I identify as the highest point.
  4. The HPS and RMRU accept the point I identify as the highest point.
So, we can clearly tell the highest point.

Now, let's return to the question of the first photograph of the ridge I displayed, taken from Folly Peak which lies to the north.  Does my first photo show the summit?  My camera has a 20X optical zoom with another 20X in electronic zoom.  Let's take a look at another photo shot from the vicinity of Folly Peak.  In the photo, we can see once again the distinctive crack system on the summit bloc. 
Zoom photo of summit bloc of Marion Mountain as seen from Folly Peak.
The distinctive cracks of Marion Mountain's summit are shown in red.
My photo does in fact show the highest point on Marion Mountain.

So, what have I established?
  1. The spot elevation of 10,362' is NOT positioned on the highest point of Marion Mountain.
  2. Marion Mountain's summit is on the western portion of the summit ridge.
  3. Marion Mountain is clearly higher than 10,362'.
The last point above is interesting.  I've always said to myself when in the summit region of the San Jacintos, "Marion Mountain (10,362' on the map) sure looks higher than Shirley Peak (10,388')."  According to the map, only twenty six vertical feet separate the two.  If Marion Mountain is higher than the elevation indicated on the map (clearly it is), then Marion Mountain might well be taller than Shirley Peak.  I suspect that Marion Mountain is the higher of the two, but I lack the means to precisely establish the height of either peak.  At this juncture, I can only establish the three points listed above.  I leave it to others to determine the exact height of Marion Mountain.

HJ

Appendix -- Further Photos of Marion Mountain
San Jacinto High Country from the highest point of Marion Mountain.
It sure looks like Shirley Peak is lower than Marion Mountain.
Marion Mountain from the flanks of Shirley Peak.
Note that the highest point is the distinctive rock bloc and is on the western end of the summit ridge
Another photo of Marion Mountain from Shirley Peak. 
Note that you can make out the large vertical crack in the summit bloc.
Marion Mountain from Jean Peak.
Note crack system in summit bloc and that summit bloc is clearly on the western end of the summit ridge.
Part one of two parts.
Snow Creek from west of the summit of San Jacinto Peak.
Note large white dot down in the drainage to the left.

Part two of two parts.
Snow Creek from west of the summit of San Jacinto Peak.
The white dot happens to be a sizeable water tank.
My zoom really is good.
San Jacinto high country as seen from vicinity the summit of Folly Peak.
Note that the western portion of Marion Mountain is clearly higher that the eastern.
Marion Mountain from Folly Peak
Marion Mountain (horizon, slightly right of center) from Newton Drury Peak.
Clearly, the western portion is higher than the eastern.


Tuesday, July 9, 2013

Water Sources of the San Jacinto Mountains -- West Side

Over time, I've done a number of overnight and day hiking trips in the San Jacinto Mountains.  I've become fairly well acquainted with the water sources on the west side of the mountains, so I thought I'd put together a list that may be helpful to people.  My most recent trip was July 5 - 7, 2013, and the data here reflects what I observed on that trip as well as my observations going back over the last half dozen or more years.

The water sources listed immediately below are sources that I have a pretty good sense for.  There are other water sources that I haven't got as good of a feel for that I have listed in Appendix IV, Other Water Sources.

First a map of (mostly) the west side of the San Jacinto Mountains.  Click to enlarge.
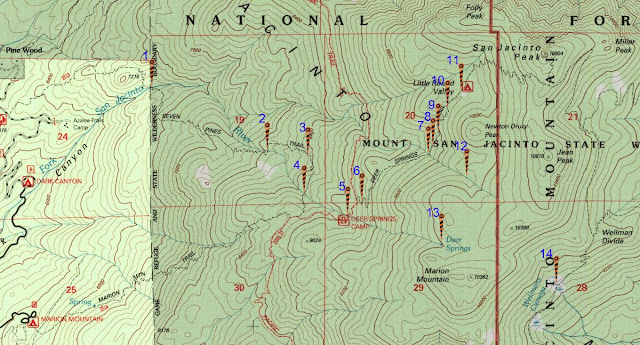
San Jacinto Mountains -- Water Sources
Next, a key:
1.  First crossing of the N Fork of the San Jacinto River by the Seven Pines Trail
2.  Second crossing of the N Fork of the San Jacinto River by the Seven Pines Trail
3.  Unnamed small stream, Seven Pines Trail
4.  Third crossing of the N Fork of the San Jacinto River by the Seven Pines Trail
5.  Deer Springs Crossing
6.  Flake Spring
7.  Bed Springs Crossing
8.  Rock Spring
9.  Lilly Spring
10.  Outflow stream from Little Round Valley where it crosses the Deer Springs Trail
11.  Stream in the meadow in Little Round Valley
12.  Bed Springs (actual spring)
13.  Deer Springs (actual spring)
14.  Wellmans Cienega (north branch)

Then, comments on each water source:
1.  First Crossing, Seven Pines Trail.  Seasonal.  Unreliable.
     Current Status:  Dry 7/7/2013.
First Crossing, 7/7/2013
2.  Second Crossing, Seven Pines Trail.  Seasonal.  More reliable than First Crossing.
     Current Status:  Low flow 10' below the trail 7/7/2013.
Second Crossing, 7/7/2013
3.  Unnamed stream, Seven Pines Trail.  Seasonal.
     Current Status:  Low flow 7/7/2013.
Unnamed stream, Seven Pines Trail, 7/7/2013
4.  Third crossing, Seven Pines Trail.  Seasonal but far more reliable than First Crossing, Second Crossing, or Deer Springs Crossing.  IMPORTANT TIP:    If Deer Springs Crossing on the PCT/Deer Springs Trail is dry, Third Crossing is only about 10 minutes off the main trail.  This is the best water source of those along the N Fork of the San Jacinto River.  Alternatively, just head to Bed Springs Crossing if you're headed to San Jacinto Peak or to Lower Bed Springs Crossing if you're headed north on the PCT.
     Current Status: Decent flow 7/7/2013
Third Crossing, 7/7/2013
The best place to collect water is slightly upstream of the trail crossing.

5.  Deer Springs Crossing.  Seasonal.  Unreliable except in wet years.
Note the use of the word "Crossing."  Most people just call this "Deer Springs," but the actual spring is far up the mountainside.  This is where the water crosses the trail, so I call it "Deer Springs Crossing" to distinguish it from the point of origination.  This is also the North Fork of the San Jacinto River.
     Current Status: Dry at the trail.  Very small pools just above the trail on 7/7/2013.  Do not expect to find water here.
Deer Springs Crossing, 7/7/2013
6.  Flake Spring.  Very seasonal.  Highly unreliable.  Water only in early season in wet years. 
So named for the large rock flake from behind which the water flows. 
Note:  Flake Spring is my name for this spring and is not a name of common use.
     Current Status:  Dry 7/7/2013.
Flake Spring.  The spring is behind the large rock flake.
7.  Bed Springs Crossing.  Perennial.  Reliable except in the driest of years.  This water source will be flowing when everything else on the west side is dry.
Note the use of the word "Crossing."  Most people just call this "Bed Springs," but the actual spring is far up the mountainside.  This is where the water crosses the trail, so I call it "Bed Springs Crossing" to distinguish it from the point of origination.  
     Current Status:  Good flow 7/7/2013.
Bed Springs Crossing, just above the trail.
This is consistently an excellent water source on the west side.
8.  Rock Springs.  Seasonal.  Unreliable.
So named for the rock which the water flows along in a groove just above the trail.
Note:  Rock Springs is my name for it and is not a name of common use.
     Current Status:  Low flow 7/7/2013.
Rock Springs.  Flowing, but just barely.
9.  Lilly Spring.  Fairly reliable.  Not a lot of flow but consistent.  Second only to Bed Springs Crossing in terms of reliability but always low flow.  Bring something to scoop with and into. 
     Current Status:  Decent flow 7/7/2013.
Lilly Spring

TIP:  Lilly spring is a good place for flower viewing.
Lemon Lillies at Lilly Spring
10.  Trail crossing of stream flowing out of Little Round Valley.  Seasonal.  Unreliable.
When there is water, this is the best place to use a pump type filter because there's usually a pool just above the trail.  It can run all year in wet years but is often dry.
     Current Status:  Dry. 7/7/2013.
Stream from Little Round Valley just above the trail crossing.  Dry 7/7/2013.
11.  Little Round Valley, stream in meadow area.  Seasonal.  Unreliable but more reliable than the trail crossing mentioned above.  Can flow throughout the year in wet years.
Water in stream bed, Little Round Valley, 7/7/2013
     Current Status:  Dry in the main part of the meadow, but water present just above Owl's Hooch Crossing 7/7/2013.  See appendix for detailed instructions for how to find water.
      Note:  The topo map shows a blue line stream just north of Little Round Valley.  Ignore it.  They were smoking crack the day they drew that blue line that far up that dry gulch. There's never water there except in very wet years when there's active snow melt going on or during a thunderstorm.  In other words, almost never.
The map marks a stream here (just north of Little Round Valley). 
Not only is there no water, there's not even a defined stream bed.  Don't bother.
12.  Bed Springs, the actual spring.  Position approximate.
     Current Status:  Good flow 7/7/2013.
Bed Springs, 7/7/2013.
13.  Deer Springs, the actual spring.    Position approximate.  Position not verified.
     Current Status:  Unknown.
14.  Wellmans Cienaga, North Branch. 
     Current Status:  Decent flow 7/7/2013.
Wellmans Cienega, North Branch, 7/7/2013.


I hope you find this helpful.  I'll expand it as time permits.

HJ


Appendix I -- Water at Deer Springs Crossing
Tip 1:  If there is no water right at the trail, go upstream a bit.  I was able to find a small pool there.
A small pool just above the trail at Deer Springs Crossing

Tip 2:  If there's no water at Deer Springs Crossing, head back down the Deer Springs Trail to the junction with the Seven Pines Trail.  Go down the Seven Pines Trail to Third Crossing which is perhaps 10 minutes down the trail.  The water is much more likely to be flowing there.

Appendix II -- Water at Little Round Valley
Proceed along the Deer Springs Trail until you see the side trail to camp site 2 (Owl's Hootch).  The side trail is marked with this sign:
The sign for the trail that leads to Owl's Hootch camp site.
Proceed a few feet to the point where the side trail crosses the stream flowing down from the meadow in Little Round Valley.  The stream may have water here.
The point where the side trail crosses the stream from Little Round Valley
If the stream is dry at the crossing point, proceed upstream about ten feet.  The stream flows between two rocks here and water is often forced to the surface.
Water, Little Round Valley, 7/7/2013
Appendix III -- General Tips for Gathering Water
Water can be in short supply in the San Jacinto Mountains. Here are some general tips:
1.  Bright green is the key to finding water.  Look for changes in vegetation.  In particular, look for a clear area in the middle of bright green vegetation.  This is the most likely spot to find water.
Wellmans Cienega, 7/17/2013
Bright green vegetation often indicates water.
Note the relatively clear area to the right -- and notice that there is flowing water here.
2.  Water sources can often be very shallow, particularly in late season.  Bring something to scoop with.  Call me old school if you like, but I like the good old fashioned Sierra Cup.  Its shallow shape and angled sides are ideal for scooping from shallow water sources.
A Sierra cup is ideal for scooping water from shallow sources.
Note size of pool.  I was able to extract four liters.
If you're using a filter or a Steri-Pen, you may need to bring something to pour into so that you can pump out of or treat in.  If you're using chemical means (typically iodine or chlorine dioxide), you can pour straight into your bladder or water bottle.  I've been using a Steri-Pen lately, and I find a cut down 2L Platypus bottle works great.  A 2L Platy already has a 1L marking (the Steri-Pen is designed to treat 1L max at a time) is tall enough that I can immerse the pen, is self standing, and is see through so that I can see if the pen is working.
Treating water with a Steri-Pen
Note how the vessel must be deep enough to immerse the Steri-Pen's bulb

Appendix IV -- Other Water Sources
The following are other water sources that I'm a little bit less familiar with.  Eventually, I'd like to add the water sources marked on this map to the main list.  I don't have as much experience with these, but here's my gut feel based on what experience I do have.
The letters represent points marked on the above linked map:
A -- Strawberry Creek. Seasonal, unreliable.
B -- Strawberry Cienega. Seasonal, but pretty reliable in wet years. Probably reliable to mid season in drier years. Unreliable in very dry years or multi year droughts. Typically low flow. Bring something to scoop with.
C -- Marion Creek. Seasonal, unreliable.
D -- Stone Creek. Seasonal, unreliable.
E -- Unnamed branch of Stone Creek. Seasonal, unreliable.
F -- Lower Bed Springs* Crossing. Perennial, reliable.
G -- Unnamed branch of the N Fork San Jacinto River. Seasonal, unreliable.

*Actually this water source is the combination of the outflow of Bed Springs, Rock Springs, Lilly Springs, and Little Round Valley. I don't have the depth of experience to completely rate the reliability of this water source, but my gut sense is that this would be highly reliable, perhaps the most reliable source on the west side of the San Jacintos above 8,000'.

Monday, April 29, 2013

East Barton Flats to Grinnell Ridge Camp

UPDATE 16 July 2015:  Many (but not all!) areas in and around the San Gorgonio Wilderness are currently closed due to the Lake Fire.  See Lake Fire Closure Map for details.  Unfortunately, the Lost Creek Trail did burn and is closed, but there are many other really worthwhile trips that are described here on my blog that are not closed.

The Lost Creek Trail is one of the lesser used trails in the beautiful San Gorgonio Wilderness.  If solitude is what you seek, chances are that you'll find it on the Lost Creek Trail.
The Lost Creek Trail.  Note how the pine needles show little wear.  This is a lesser used trail.
 As the Lost Creek Trail crests the shoulder of Grinnell Ridge, one comes to Grinnell Ridge Camp, a fine place to spend the night.
"Rush hour" at tranquil Grinnell Ridge Camp
Well, if the Lost Creek Trail is such a nice hike, why isn't it used more often?  I think there are three reasons:
  • The attractive presence of nearby "name" destinations like Dollar Lake and Dry Lake.
  • The 5.3 mile/ 8.5 km with nearly 2000'/600m of gain climb from the Lost Creek trailhead.
  • Apparent lack of water (there's actually a nearby spring, but most people don't know about it -- more on that later).
I won't try to argue that lakes aren't an attractive destination, but if crowds are something you'd like to avoid, then perhaps the Lost Creek Trail and Grinnell Ridge Camp are worth a look -- particularly in a dry year like 2013 when both Dry and Dollar Lakes will probably just be mud holes by mid-summer.

But what about the other two "negatives" associated with Grinnell Ridge Camp, the climb to get there and the apparent lack of water?  Well, let me address each of those in turn in the form of a Trip Report, to wit:

East Barton Flats to Grinnell Ridge Camp
I had always liked the "away from it all" feel of Grinnell Ridge Camp ever since I had first visited it about 20 years ago.  However, the 10+ miles (16+ km) round trip required to get there seemed a bit much for a non "destination" single day hike, a "destination" hike being one where one reaches some attraction like a peak, meadow, lake, or view point.   In other words, the hike required is a bit much for a trail with no particular "destination" other than the flat spot that is the camp.  But what if there were a better way to get there?

On a recent trip down the Lost Creek Trail, I noticed something:  An old road descending into the South Fork drainage that separates the Barton Flats area from the Lost Creek area.
An old road descends from Barton Flats into the canyon of the South Fork of the Santa Ana River
At the bottom of the drainage lies the South Fork of the Santa Ana River.  If I could use this old road as an entry point for a hike, I would add a water source to the otherwise dry hike!

Intrigued, I checked my topographic map.  Sure enough, I could see the old road on my map (from points "A" to "B").  Although the old road is shown as abruptly ending on the map, I'm sure that it originally linked up to point "C."  From past experience, I knew that the lower portion of the Lost Creek Trail was at one time a road.
The lower section of the Lost Creek Trail.  Clearly, it used to be a road.
But hiking from point "B" to "C" would take me in the opposite direction of where I wanted to go.  Then I noticed the shallow saddle at point "D".  The contour lines leading up to the saddle looked quite gentle.  Could I make this into a cross country route?  I decided to try.

First I mapped out a route that would take me to Grinnell Ridge camp (point "T") and some intriguing points to the east.  I'll say more about those points to the east in a minute.

Then, I had to locate the old road in the Barton Flats area.  Fortunately, just by entering the flats on the main dirt road marked simply "East Flats" and heading east, I was able to find what I felt must be the right road.  However, it's not as simple as it might look on the map:  there is a web of small, unmarked dirt roads all over the East Flats area.

I have a good sense of the area having done many previous scouting trips, and the road's direction matched that of the road marked on the map, so I set out.  I had to park my car quite a bit farther than the map would indicate; there is a locked metal gate at point "A" on the above linked map that prevents further driving access.  By the way, I was driving a Honda Civic.  With care, I was able to negotiate the dirt roads.
The old road in east Barton Flats
At point "B," I met with a typical conundrum in the East Flats area:  an unmarked junction with another road.  My topo map showed the main road heading east.  I went east, which turned out to be the correct choice.

Soon, I came to the lip of the canyon.  Turning right (SSW), I found my road.  The way was clear!
The start of the old road heading down into the canyon of the South Fork.
Note the large avalanche path on the mountain in the distance.
Obviously the road hadn't been maintained in a good long while, but it was certainly passable on foot, and it led me to...
Downed tree across the old road
...the South Fork of the Santa Ana River!
The South Fork of the Santa Ana River
Crossing the river, the road wasn't in such good shape.  Clearly, the river itself is a barrier to further progress to the east.  Fortunately, this (2013) is a dry year, and I was able to cross without incident.
The road on the far side of the river.
After crossing the river, I turned right (SE) to follow the little side drainage marked as point "E" on the above linked map.  The drainage proved to be a bit brush choked.
Heading up the side drainage away from the river.
Given the brush, I decided to climb out of the drainage.  Arriving at the lip of the drainage, I was pleased by what I saw:  Relatively open terrain, easily suited for cross country hiking.  Hallelujah!  There would be no bush whacking today, just open country off trail hiking, one of my favorite activities.  Trails are just a crutch, you know.  ;)
Open terrain east of the South Fork
Heading up, I reached the top of the first major ridge to the east and found the Lost Creek Trail.  My new "trailhead" route had proven to be very workable indeed.
The Lost Creek Trail
Since I've been working so much, I'm pretty out of shape right now.  I opted to follow the Lost Creek Trail's gentle ascent path up Grinnell Ridge rather than cutting steeply up the slope directly.

Grinnell Ridge is fairly flat topped in the vicinity of Grinnell Ridge camp, terrain again easily suited to cross country.
The terrain levels out considerably as one approaches the area near Grinnell Ridge Camp

I again left the established trail and headed due south to Grinnell Flats (points "O" and "P").  Grinnell Flats is an interesting, large flatish area atop Grinnell Ridge.
Grinnell Flats
Now, from point "P" in Grinnell Flats, I could easily head WSW to Grinnell Ridge Camp, but I'm not going to.  Why?  Well, I'm looking for Mosquito Spring, a small spring that lies to the east of Grinnell Ridge Camp.  It's a bit of a trick to find, but I've been able to find it every time I've looked for it.  The real trick is to know that it's there; it's only marked on old maps.  Mosquito spring lies at approximately elevation 8070 feet/2460m on a small ridge east of the main spine of Grinnell Ridge at approximately point "R."  The location of the spring is a bit odd in that it's on the ridge rather than down in the drainage just west of the ridge.  Look for a spot of bright green vegetation.
Bright green vegetation is the tell tale that will help you find Mosquito Spring
The spring itself is in a shallow grass rimmed depression.
Mosquito Spring
Notes on Mosquito Spring:
  • Flow is very low.  In dry years, the spring will be dry in late season.  In multi-year droughts, the spring may be dry earlier in the season.
  • The spring is shallow.  Bring a sierra cup or something similar to scoop water with.
  • There typically is a bit of organic material (pine needles, grass, etc.) in the water.  Filter through a bandana to remove.
  • Even though it's a spring and springs are usually safe drinking water sources, I would treat this source (filter, UV light, chemical, or boiling).  The water has a bit of an oily sheen too it which is probably organic in origin, but just in case.
  • If you plan to use a backpacking filter, bring a pot or other container that you can fill first and then filter from there.  If you filter directly from the spring, you'll stir up too much muck.  The spring is very shallow.
  • Please see Appendix A for other water alternatives.
There are some nice rocks near Mosquito Spring, so hungry and thirsty, I set up my "kitchen."
My kitchen set up
My kitchen on this trip is a Ti-Tri Sidewinder cone and a 12-10 alcohol stove (both from Trail Designs with a 1.3L Evernew pot .  The small ring seen at the left is a simmer ring for the 12-10 stove.  The pouch is from Gossamer Gear and contains my spoon and my lighter (among other things).  If you're interested, I have a review of the Ti-Tri Sidewinder posted on my other blog, Adventures In Stoving.

Using my kitchen, I first get my water to a rolling boil.  Then, I put on the simmer ring, which tones down the flame substantially (takes a while for it to kick in) and add my noodles and dried veggies.  I follow the old mountaineer's trick of adding more water than the recipe calls for in order to hydrate better.
Lunch is served!
My repast consumed, I then head a few more minutes east to Hook Point which as its name suggests hooks out into the void that is the canyon of Lost Creek (Point "S").  Hook Point is one of the traditional camps of yesteryear before the permit system was established.  If one looks carefully, one can still see the remains of fire circles of old.  The Grinnell Mountain Track leads further into the Lost Creek  drainage, but my time was running short for this trip, so I opted to head to Grinnell Ridge Camp and to start the homeward leg of my journey.  I've actually explored down into Lost Creek before, but I'll save that write up for another time.
Hook Point Camp

From Hook Point, I head WNW on what remains of the Grinnell Mountain Track.  The Grinnell Mountain Track is extremely faint and in many areas is completely imperceptible.  In fact, the only way I was sure that I was actually on the old trail and not a game trail was this cut log.  Logs are generally only cut like this to allow a trail to pass through.
The Grinnell Mountain Track is a very faint trail of yesteryear.
Finally, I arrive at Grinnell Ridge Camp.  I won't spend the night here this time, but here I can pick up the Lost Creek Trail which will take me back to my car.
The Lost Creek Trail departs from Grinnell Ridge Camp
I won't bore you with the return trip.  Please see Appendix B for other route alternatives.

I thank you for joining me on this little trip to a somewhat forgotten but very much worth while corner of the San Gorgonio Wilderness.

HJ

Appendix A -- Water alternatives for Grinnell Ridge Camp
  • First of course is Mosquito Spring, but the spring is unreliable in late season and may even be unreliable in early season during multi-year droughts.
  • Just east of camp, there are often snow banks on the shaded north slopes.  These snow banks will persist into early May in decent snow years and will persist all the way until June in heavy snow years.  In early May 2012, there was snow.  In late April, 2013, there was no snow.
  • Water may be carried in one mile (1.6 km) from the South Fork Meadows area.  If one approaches Grinnell Ridge Camp from the south (i.e. from the South Fork Trail), this is a very good option.  The trail is relatively flat and not overly long.
  • Water may be carried in from the lower reaches of the South Fork of the Santa Ana River if one uses the route from East Flats (i.e. the route described in this trip report).  Not particularly desirable, but it can be done.
  • Water may be carried in from the Lost Creek trailhead near South Fork Campground.  This is the least desirable option unless you're really strong.
Appendix B -- Route alternatives
  • The most obvious route to Grinnell Ridge Camp is from the Lost Creek trailhead.  It's a fine hike of about 10.6 mi/17 km round trip and 1800'/550m gain and loss. 100% maintained trail.
  • The second obvious route is from the South Fork trailhead.  The round trip distance is identical according to the mileages listed in Tom Harrison Maps.  The gain and loss is only 1250'/380m.  This route has the great advantage of having water en route, only one mile (1.6 km) from and only 130'/40m of gain to camp.  Grinnell Ridge Camp is the closest authorized backcountry camping location to the South Fork trailhead.  100% maintained trail.
  • Grinnell Ridge Camp makes a wonderful overnight stop as part of the Grinnell Mountain Loop.  The Grinnell Mountain Loop starts at South Fork Campground, takes the Santa Ana River Trail to Fish Creek, follows an unmarked but easily followed trail up Fish Creek to Aspen Grove, joins the main trail from Aspen Grove to Fish Creek Saddle, goes to Dry Lake from Fish Creek Saddle via an unmaintained but still followable trail, heads from Dry Lake down to South Fork Meadows, climbs gently to Grinnell Ridge Camp, and then descends via the Lost Creek Trail back to South Fork Campground.   In the process of completing the loop, one completely circumnavigates Grinnell Mountain, hence the name "Grinnell Mountain Loop."  100% trail although some sections are unmaintained.  Approximately 22 miles/35km. 
  • Then there is the route described in this trip report that goes from  East Barton Flats to Grinnell Ridge Camp.  Combination old roads, cross country, and maintained trails.  Approximately 8 mi/13 km round trip.
  • Finally, there is a cross country variant of the Grinnell Mountain Loop.  Instead of taking trails from Fish Creek Saddle, climb the flanks of Grinnell Mountain and descend Grinnell Ridge cross country directly to Grinnell Ridge Camp.  This route is a map and compass challenge for those well versed in such travel.  Not recommended for those new to off trail navigation.  Cuts off a mile or two from the standard route (see above), but is slower due to its cross country nature.  Additional gain required to attain the flanks of Grinnell Mountain.