In Southern California, there is a hike with a certain notoriety. It is considered one of the toughest day hikes in the southwestern United States. Which hike am I speaking of? The infamous
Skyline Trail that goes from 500'/150m in the city of Palm Springs in the desert to 8500'/2590m in Long Valley in the San Jacinto Mountains. The Skyline Trail gains some 8000'/2400m in about 9 miles/14.5km! If you know anything at all about hiking, you'll recognize from the numbers that this is an extremely steep route.
The Skyline Trail forms the bulk of the "Cactus to Clouds" hike that goes from the low desert to the summit of San Jacinto Peak (10,834’ /3302m), gaining over 10,000'/3000m! My trip today covers only the Skyline Trail portion of the Cactus to Clouds route.
 |
| Shadow of a hiker on the Skyline Trail |
The best information I have indicates that the Skyline trail was built during the Great Depression by the Civilian Conservation Corps as a route to travel from the desert to the beautiful high country of the San Jacinto Mountains. In September, 1963, the Palm Springs Aerial Tramway was completed. The tram goes to approximately the same spot that the old Skyline Trail goes to. With the advent of the tramway, one could travel effortlessly from the desert floor to the mountain heights in a matter of minutes -- a trip that typically takes a full day using the trail.
 |
| The Palm Springs Aerial Tramway as it passes by prominent Coffman's Crag |
Today, the tram is the typical way for people to visit Long Valley. The Skyline trail is now reserved for two classes of people: The hardy and the foolish. To take on a hike with 8000' of gain without proper preparation and planning is the height of foolishness, and a number of people have paid with their lives. The Skyline trail goes through the blazing desert. The sun is unrelenting and is no respecter of persons. Both the fit and the flabby have perished. Heat stroke is a killer most deadly. In the winter, the upper section is often coated in ice. A misstep here can -- and indeed has -- lead to a very violent death. I neither wish to "oversell" (make out the trip to be worse than it actually is) nor "undersell" the Skyline Trail (play down the objective dangers of the trail), but
one should not take on the Skyline Trail without doing one's homework. Proper planning and preparation are key. Typically the summer is simply too dangerous due to heat. Likewise, winter is too treacherous due to ice and snow. The most common times to do the Skyline Trail are April and October/November.
If it is helpful, here is my
Skyline Training Plan, that is, the activities that I undertook to prepare for doing Skyline. An appropriate level of fitness is essential prior to tackling the Skyline Trail.
One last word of warning about Skyline before I describe my ascent: This is a
committed route. What do I mean by "committed?" There is no way to abort a hike once you start. In other words, once you get onto Skyline, you're committed. If you go up, but get too tired to continue, you (in hot weather) can't just head back down. As you head down, the temperature will increase. You're essentially descending into an inferno. From what I've read, this seems to be the pattern for most of the people who have died on Skyline. They started up, got into trouble, headed down into the firey furnace of the desert, and succumbed to the heat. Again, I'm not trying to scare anyone off who knows what they're doing; I'm just trying to be responsible and present what are the very real objective dangers.
OK! Enough "mother hen!" On with the hike.
There are several ways to get on to the ridge that the Skyline trail follows (hereinafter called "Skyline Ridge"). I chose the trailhead that starts at the west end of Ramon Road in Palm Springs.
 |
| Ramon Road dead ends into Skyline Ridge |
I wasn't sure just how long it would take me to do the approximately 9.5 miles/15.25km. I had done several climbs of 4000'/1200m and 5000'/1500m, but I had
never done a climb of 8000'/2400m in a day. Not knowing how long it would take and wanting to minimize my water consumption in the arid desert, I started at 0430, about an hour and a half before dawn.
 |
| Trailhead sign at the end of Ramon Road. Note that this section is called the North Lykken Trail. |
The route is a bit tricky at the beginning. At first you follow a wide old road that starts to the left (west) of the trailhead sign.
 |
| The route starts on an old dirt road |
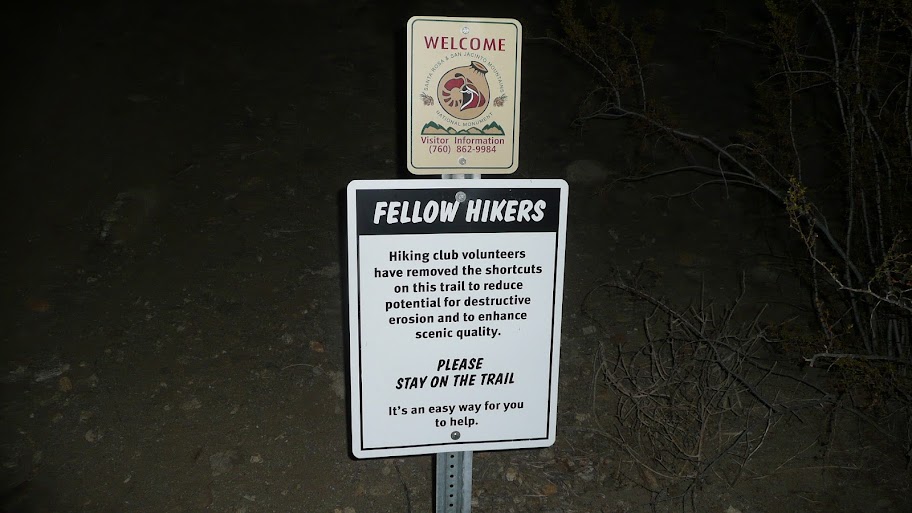
Shortly, you should see a metal trail sign on your left. You must take a hard left here and leave the old road. The message of the sign is worth noting: Please stay on the trail.
 |
| Leave the dirt road at the sign and start up the trail. |
The trail is in pretty good shape. I had no trouble following it, even in the dark.
 |
| The trail is easily discerned. |
Not that the trail is hard to follow, but someone has painted large white dots on the rocks alongside the trail. I'm not particularly fond of such practices, but since they're already there, they can serve as an aid to travel.
 |
| The rocks along side the trail are marked periodically with large dots |
As I ascended, I passed this cute "It's Raining Sunshine" sign:
 |
| Sign on the North Lykken Trail. Very groovy. :) |
At the upper end of the North Lykken Trail, there's another sign imploring people to stay on the trail.
 |
| Sign marking the upper end of the North Lykken Trail |
There's also a large rock cairn marking the junction with the trail coming up from the Art Museum.
Turn left here.
 |
| A large rock pile (cairn) marking the upper end of the North Lykken Trail. Turn left here. |
After turning left at the cairn, we're on the Skyline Trail proper. We soon come to the "Painted Rocks" at about 1600'/488m elevation. The first rock indicates that one should turn left and that Long Valley is about 8 miles/13 km away.
 |
| The first painted rock |
There's actually another painted rock before the one pictured above, but it's unclear what it once said.
 |
| Another painted rock, but God only knows what it once said |
Shortly after the "Long Valley, 8 miles" rock, we come to another painted rock.
 |
| The "Reality Check" rock |
I call this rock the "reality check" rock. There quite literally is no water until you reach the Long Valley Ranger Station (the rock incorrectly says "Round Valley") or the upper tram station. You must be prepared for up to 10 hours of hiking. There is another painted rock nearby, but it wasn't clear what it said.
One of the advantages of starting pre-dawn is that one gets to watch the eastern horizon grow progressively brighter.
 |
| Palm Springs, pre-dawn |
Just moments before dawn:
 |
| Sky, brightening in the east |
And finally, dawn!
 |
| Sunrise, Coachella Valley. |
The ruddy rays of early morning cast an interesting hue on rugged Skyline Ridge.
 |
| Early morning light on Skyline Ridge |
Now dawn in December (when I did the hike) is not too bad. The expected high in Palm Springs was about 80F/27C, not too bad, particularly if one gets an early start. However, when the expected high is over 100F/38C, dawn can be extremely bad news if you're not high enough on that ridge. Even though it was December, it got plenty warm in the sun on my hike. I was glad that I started early.
Ascending further, we come to the first of two rescue boxes at about 2455'/748m.
 |
| The first rescue box. The solar powered light on top comes on at night. |
The rescue boxes are a grim reminder of those who have died or come near death on this harsh trail. Inside supposedly are a telephone, water, and some other essentials. Shockingly, some people are taking supplies out of the boxes when there isn't an emergency. When there really is an emergency, somebody could be in life-threatening trouble if the box has already been emptied. It's hard to imagine just what kind of low life would steal emergency supplies in the wilderness. Because of pilferage,
never count on there being water anywhere on Skyline, not even in the official rescue boxes.
But grim reminder aside, the boxes (along with other distinctive landmarks) also serve a useful purpose to those who are prepared and ready for the trail: They serve as waypoints by which one may gauge one's progress and positively identify one's location. The So Cal Hikers have put together a nice map (click to enlarge) that shows the
general route of the trail and the location of several easily identified landmarks.
 |
| A very useful map compiled by the So Cal Hikers (click to enlarge) |
Please see the appendix for my times and my comments on pacing for this hike.
One of the great attractions of the Skyline Trail are the varied terrain and fabulous views. Here I'm looking at a wind farm from far above.
 |
| Rocky terrain and desert views |
The land forms themselves are impressive, but the views are sublime.
 |
| The Salton Sea aglow in the morning sun. |
There is more than just rock and vista: Desert life is found in abundance.
 |
| A family of deer browse their way up the mountain near the Skyline trail. |
Many fascinating plants inhabit the desert sections of Skyline.
 |
| The dreaded cholla (pronounced cho - yuh) cactus. Stand clear! |
 |
| Mini barrel cacti |
 |
| Banana leaf yucca |
 |
| Ribbonwood |
As I ascended, I could see why the Skyline Trail has such a reputation as a killer. Even though it was December and I started early, I was sweating fairly heavily. The desert sun was unrelenting.
 |
| The intense desert sun |
In the desert sections of the trail, there is essentially no shade. There is one small, sparse grove of spindly pinyon pines at about 5000'/1500m, but there is no real shade until about 7000'/2100m. As I climbed through the steep terrain, I was glad that I had brought a sun hat and sun glasses.
 |
| Ascending steep terrain on Skyline Ridge |
As we near the 4000'/1200m mark, the tram comes into view.
 |
| The quintessential "Cactus to Clouds" shot. In the foreground, cholla cactus. In the background, the pine forests of San Jacinto. Can you spot the Palm Springs Aerial Tramway? |
Looks, though can be deceiving. At 4000'/1200m, you're less than half way there. What's really happening as you near the 4000'/1200m mark is that the ridge levels off significantly. Without a steep ridge to block your view, you can now see your destination -- the tram. The trail tops out just south of the tram. However, the clear, desert air is deceptive. I reached 4000'/1200m around 0830. I still had another
five hours and 4500'/1370m to go! Don't be taken in by the view. Keep on pace and keep hiking.
The next land mark we pass is the "4300" marker emplaced by none other than Doreen the Skyline Queen.
 |
| The 4300'/1300m marker. |
Doreen has the unique distinction of having ascended 274 times (as of the date of my hike on December 8th), more than any other person.
 |
| Doreen, the Queen of Skyline. Note the steepness of the terrain. |
The 4300 marker is a great place to check in and see if you're on pace. It also more or less marks the section of the route known as the Never Ending Ridge. Here, the rate of ascent slows, and you go over undulating bumps on the ridge, occasionally even losing altitude. This loss of elevation means that the real elevation gain on Skyline is actually greater than just the net difference between the starting point and the ending point of the hike. Fortunately, none of the losses is particularly great. Without having used any instrumentation, my gut feelings is that the undulations add perhaps another 250'/75m of gain. I've seen some sources that state that the overall gain on the Skyline Trail is 8400'/2560m.
This section of the hike is comparatively mellow, and is a nice respite in a way, but there's a problem. Take a look at this photo shot just beyond the 4300 marker and see if you can determine what the problem is.
 |
| The long, flat section of the Skyline Trail known as "the Never Ending Ridge." Note how the terrain gets steep like a wall at the far end of the Never Ending Ridge. |
Do you see the problem? We've still got over 4000'/1200m of elevation to gain, but we're gaining relatively little. Not gaining elevation now means
we've got to gain that elevation later. And gain elevation we do -- with a vengeance. The terrain steepens at a rate that's got to be seen to be believed past the Never Ending Ridge.
The steepest sections of Skyline are above 5800'/1760m. Pace yourself accordingly.
Looking back down from the start of the Never Ending Ridge, we can see we've climbed a heck of a lot -- over 4000'/1200m, the equivalent of climbing Mount Baldy via the ski hut, but we're only about half way there, elevation gain wise.
 |
| Looking back from near the start of the Never Ending Ridge |
On the plus side, the views of the San Gorgonio area are spectacular from the Never Ending Ridge.
 |
| The San Gorgonio Wilderness lies to the north of Skyline. |
The highest peaks in Southern California are in the San Gorgonio Wilderness, including the very highest, San Gorgonio Mountain (11,502'/3506m). We can also see lesser known peaks like the Dragon's Head and Bighorn Mountain. By the way, if you're interested in peak bagging in Southern California, you may find my list of
Peaks over 10,000'/3048m in Southern California helpful.
 |
| High country peaks clearly distinguishable from Skyline |
One of the fascinating things about Skyline is watching one's surroundings change as one passes through the varied life zones. One starts in the Lower Sonoran, proceeds to the Upper Sonoron, then the Transition Zone, and then eventually into the Boreal Zone. At about 5000', one runs into a small copse of Pinyon Pines on a north facing slope. Such sparse trees aren't much help if one needs shelter from the sun, but in this life zone, that's really all that's available.
 |
| Pinyon Pines (Pinus monophylla) at about 5000'/1500m |
Continuing on up, we reach the second of the two rescue boxes at about 5400'/1645m.
 |
| Rescue 2 |
Passing Rescue 2, we see that we're rapidly approaching the end of the Never Ending Ridge portion of Skyline, and we can see the terrain steepening like a wall ahead.
 |
| The terrain steepens considerably after the Never Ending Ridge section of Skyline |
As we near the end of the Never Ending Ridge, we can see that we're about to join some truly steep terrain.
 |
| Steep terrain to the north northwest of Skyline |
Just before the end of the Never Ending Ridge, we come to Florian's Bucket. Florian is a local and frequently hikes Skyline. He placed a bucket here which sometimes contains emergency water.
 |
| Florian's Bucket, 5800'/1760m |
Again, though, some dirt bags have taken the water in non-emergency situations. I can't imagine the kind of low life that would steal emergency water, but it happens on a regular basis. NEVER COUNT ON ANY WATER ON SKYLINE, even in the official rescue boxes. On the day I was there, there was only one bottle, and the bottle only contained an inch or two in the bottom.
 |
| Water (what's left of it) in Florian's Bucket |
Finally, we reach "Flat Rock" which is a dry water course that marks the end of the Never Ending Ridge section of Skyline.
 |
| Flat Rock. 5890'/1795m. |
Above Flat Rock, the trail steepens considerably and passes through "the manzanita."
 |
| Hikers passing through the manzanita (Arctostaphylos spp.) section of the Skyline Trail. |
At this point, one is essentially past the desert life zones and into chaparral. There are even a few scrub oaks, but shade is still in woefully short supply.
 |
| A scrub oak (Quercus spp.) on the Skyline Trail above Flat Rock |
Looking back from the manzanita section, one can see the relatively flat Never Ending Ridge section of Skyline. One can also see the transition from desert to chaparral and the vegetation gets progressively more dense and more green.
 |
| Looking back down the Never Ending Ridge |
Climbing further still, we enter the Boreal Zone as we near 7000'/2100m. Here, we see our first pondersa pine (
Pinus ponderosa) tree.
 |
| Mixed oak and pine in the Boreal Zone. |
The terrain gets quite steep as we ascend toward a rocky outcrop.
 |
| Ascending the Skyline Trail at about 7000'/2130m. |
Below the outcrop, the trail turns to the WNW and levels off in what is known as The Traverse. Near the start of The Traverse, we can look back and see how far we've come from the Never Ending Ridge (and from the desert floor far below!).
 |
| Looking back from just below The Traverse. Note how much steeper the terrain is above the Never Ending Ridge. |
As we near the traverse, we get some good views of the tram cars on their way to the Mountain Station.
 |
| A tram car ascending to the Mountain Station |
At long last, we reach the Traverse at about 7500'/2280m.
 |
| The beginning of The Traverse |
Here, as the name of this section implies, the trail traverses, heading toward Coffman's Crag.
 |
| Coffman's Crag as seen from near the start of the traverse |
In the traverse, you're in pine and fir forest, and there's plenty of shade. Indeed, on the day I did Skyline, it was downright chilly in the Traverse, and people were stopping to put on jackets.
 |
| Beautiful view from the forested slopes near the Traverse |
The cool, shaded slopes tend to hold snow and ice. It is here that many have gotten injured, and some have paid the ultimate price. One look down the steep chutes of the Traverse is enough to make most avoid the area when snow and ice are present.
 |
| A steep chute below The Traverse. |
Having traversed to the WNW, we come near to the base of rugged Coffman's Crag.
 |
| Coffman's Crag |
Coffman's Crag has been visible throughout much of the hike and serves as an important visual reference point, particularly as one completes The Traverse. If one begins to ascend too soon, one can get into terrain so steep that it is very difficult to ascend. People have have gotten stuck in this terrain, unable to ascend or descend and have required rescue. The trick is to get right up to Coffman's Crag. If you can see into the gully at the base of the crag, then you've traversed far enough, and it's appropriate to start to ascend to Grubbs Notch.
 |
| The gully at the base of Coffman's Crag |
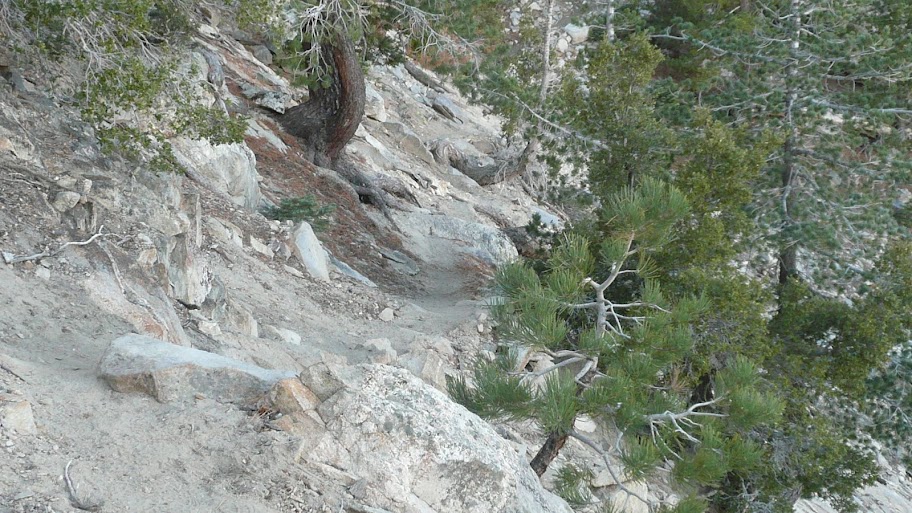
If you look at the terrain, I think you can see why it's important to get the right chute. It's brutally steep. Finding the trail here is a real asset.
 |
| Hikers ascending the extremely steep terrain above The Traverse |
As one ascends the final leg to Grubbs Notch, one gets great views of impressive Coffman's Crag.
 |
| Coffman's Crag |
Finally, after many hours (nine for me), the proverbial "light at the end of the tunnel" shows itself, and one at long last arrives at Grubbs Notch.
 |
| Final approach to Grubbs Notch |
The heavens didn't open up, and no choirs of angels sang, but boy it sure felt good to get to Grubbs Notch!
 |
| Looking back at Grubbs Notch from Long Valley | |
|
|
Heading to the tramway for the ride down is relatively trivial after ascending Skyline.
 |
| Heading through essentially flat Long Valley |
But the concrete ramp leading to the tram takes on mythic proportions in the minds of many Skyline hikers. Somehow this short strip of paving seems impossibly difficult.
 |
| Ascending the ramp to the tram. Almost done! |
Even though it was December, I was truly fortunate to have a day with gorgeous weather.
 |
| Forested Long Valley, as seen from the ramp leading to the tram. What a difference compared to where I started! |
And finally, at long last, I arrived at the tram, where I promptly engaged in that most time honored of traditions, a celebratory beer. That smile speaks volumes, doesn't it? Many thanks to my friend Ellen for the beer.
 |
| Best. Beer. Ever. |
And thus ends my journey up Skyline. Many thanks to the many members of the
Mt. San Jacinto Outdoor Recreation Forum for their advice and encouragement. Thanks also to members of the
Mt. San Jacinto Hiking Club for their fellowship and for letting me carpool back to our vehicles with them.
Special thanks to Cynthia, who opened her home to me that I might have a "base camp" to operate from (and who makes a
darned good marionberry pie).
Thanks for joining me,
HJ
Some Final Thoughts
- Weather. Get in shape of course, but the weather factor is HUGE on this hike. Pick a cool day (typically early spring or late fall), and make sure there's no snow or ice on the traverse.
- Water. Bring more water than you think you'll need. Four liters was fine for a cool December day with an early start. Seven or eight liters is more typical in warmer weather.
- High gain, steep training hikes. Make sure you do a couple of steep hikes with about 5000'/1500m gain prior to doing Skyline. You really don't know that you can do the hike until you've done some steep, big gain hikes first. See Appendix C, below, or my Skyline Training Plan for some ideas for good training hikes.
- Taper off. In the last couple of weeks leading up to Skyline, I really took it easy. I still did regular hikes, but no high gain, high difficulty hikes in the last couple of weeks before Skyline. I think tapering off is as important as training, water, and weather.
Appendix A, My Times:
Ramon Road -- 0430
Painted Rocks -- 0530 (1.5 mph)
Rescue 1 -- 0640 (1 mph)
4300' Marker -- 0840 (1 mph)
Rescue 2 -- 1015 (1.25 mph)
Florian's Cache -- 1040 (0.75 mph)
Flat Rock -- 1105 (1 mph)
The Traverse -- 1235 (2.1 mph)
Coffman's Crag -- 1305 (0.8 mph)
Grubbs Notch -- 1330 (0.6 mph)
Tram -- 1350 (1.8 mph)
The steepest sections are above Flat Rock.
Pace yourself accordingly.
Oddly, my fastest section was the steep section from Flat Rock to The Traverse. However, "Zippety Dude," who is a trail runner joined me for that section. I may have been hiking faster just so I could continue in his company. Overall, I was very pleased with a 9 hour time for Skyline for a first effort. I did very well, and at no time was I "dragging" (struggling) as I progressed. I had never done 8000'/2400m of gain in a day before. It's nice to know that I can.
Note: I'm basing the above speed calculations on the mileages on the map from the So Cal Hikers. I have not validated these mileages.
Appendix B, Gear
Here's what I carried. It worked for me.
- Water -- 5 Liters total. 4 liters in soft sided bladders, 1 liter in a standard Nalgene bottle.
- Food -- Hard candy, various trial bars, Clif shot blocks, Gu shots. NO PROTEIN. Protein takes a lot of oxygen to digest. Protein does not work for me on ascents. YMMV.
- Clothing (worn) -- "convertible" nylon pants, long sleeved nylon shirt, midweight hiking socks, trail shoes (not boots), broad brimmed sun hat.
- Clothing (carried) -- Lightweight fleece turtleneck, down vest, ultralight WPB (waterproof breathable) shell, ultralight wind pants, ultralight wind shirt, fleece gloves, fleece hat, spare socks.
- Emergency gear -- The traditional 10 essentials, 406 MHz Personal Locator Beacon (PLB), space blanket, whistle, various other small items.
Notes on gear:
- It was December, so I carried a fair amount of clothing just in case I got caught out after dark for some reason. I used none of it, but I was glad to have it along. It was cold on the Traverse, even at 1300 in the afternoon.
- I carried 5 liters of water, but I really only needed 4 on the cool December day I did the hike. In the summer, 7 or 8 liters is more common for hikers. Soft sided (Platypus type) containers are much lighter than the traditional Nalgene bottle. A Nalgene bottle weighs 1/4 pound (0.1 kg) empty whereas my Platypus hydration bladder weighs 6 oz (0.17 kg) but carries three times as much water.
- Despite it being December, I was really glad to have a sun hat and sun glasses. The desert sun was still fairly intense.
- I carried not one but two head lamps so I could make maximum time in the dark. I used a flood type head lamp (diffuse beam) affixed to a belt around my midriff to provide contrast. A light shining at the same angle as one's eyes does not provide contrast. I used a spot type head lamp (very focused beam) worn in the typical fashion on my forehead for distance vision. I've used this two head lamp combination a number of times when I've wanted to travel full speed in the dark. I have found the two head lamp combination to be very effective.
Appendix C, High Gain Training Hikes
Here are some fairly steep hikes that have at least 4000'/1200m gain. Obviously, you don't want to
start a training program with these hikes, but you should work several of these hikes into your training regimen prior to attempting Skyline. I'm sure there are others, but these came to my mind.
- Mount Baldy (Mount San Antonio) via the ski hut. ~4000'/1200m of gain.
- Newton Drury Peak or San Jacinto Peak via the Marion Mountain Trail. ~4000'/1200m of gain.
- Momyer Creek Trail to East San Bernardino Peak or Anderson Peak. ~5000'/1500m of gain.
- San Jacinto Peak via the Deer Springs Trail. Go by way of Wellman Divide. ~5000'/1500m of gain.
- Mount Baldy (Mount San Antonio) via Bear Flats. ~6000'/1800m of gain.
- San Gorgonio Mountain or Jepson Peak via the Vivian Creek Trail. ~6000'/1800m of gain.
- Iron Mountain from Heaton Flat. ~6000'/1800m of gain.